Next up I am going to try shoving some teriyaki chicken in there, and then I will glaze the outside bacon with more teriyaki sauce! (How can that be bad, right?!) I'll keep you posted!!! :)
I love trying new recipes - but more importantly, I love when those new recipes becomes the best thing I've ever put in my mouth... I knew this sounded good (fruit - stuffed with meat - wrapped in bacon... omg!!) but then 4 hours later off the smoker - I have to say this is one of the best meals I've ever had. 
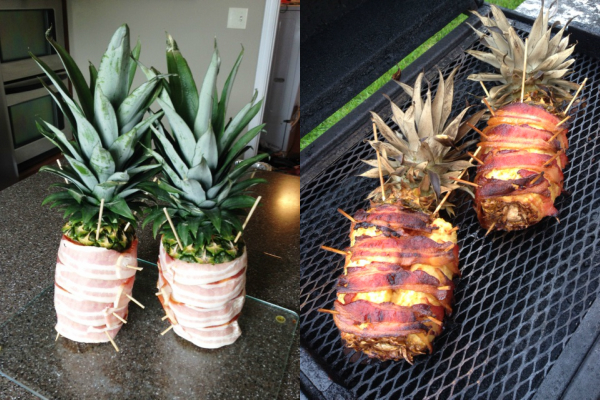
It does take a little work - but it is OH so worth it. Two pineapples will comfortably feed 6 adults (we did have a little more left over too that we just threw on the smoker with these). We had a 4 pound pork loin, and rubbed it in a simple pork rub (really, any flavor will do). Cut the outside off your pineapples and core out the center (you want to make a big enough hole down the middle to be able to shove the meat through... :) We kept the tops on just for looks (what can I say, I like my food to be pretty too!) - cut up your pork loin into smaller pieces to fit inside the pineapple and shove it on in there. Then wrap the pineapple in bacon slices and secure with toothpicks or kabob skewers. We smoked this for 4 hours on the smoker (spritzing it with some apple juice periodically). Once you pull it off, just slice it up and serve in "rounds" (like this pic): 
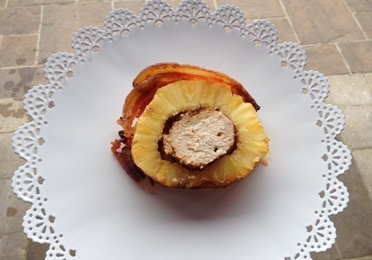
Then... EAT! (Even though it looks pretty like this, you'll want to hack it up on your plate so you get bites with bacon, pineapple, and pork altogether).
Next up I am going to try shoving some teriyaki chicken in there, and then I will glaze the outside bacon with more teriyaki sauce! (How can that be bad, right?!) I'll keep you posted!!! :)
0 Comments
In the not-so-distant future, I will be blessed with an amazing, luxurious experience - leaving my children for 48 consecutive hours. Yes, you read that right. Two solid days where I am not responsible for little people. A place where there is wine - lots of wine. Apparently dreams really do come true! I am embarrassed to admit that I have only been away from my kids overnight twice before - yes, TWICE. Like, in their whole lives. And they are school-aged. (You kinda want to buy me a sympathy-vacation right now, don't you?! :) I've always had the intention to create a "house binder" - you know, one central place for all the important things related to our home (the number for our plumber, our account # for the power company, stuff like that, along with emergency contacts for the rare occasion we actually have a babysitter...) But I've never been pushed to do it. But now, NOW I really have an excuse! Whoo hooo! Now this one may be a little more in-depth than what you're looking for (for example, the entire "how to" section for my 70 year old in-laws - you know, 'how to operate the TV,' 'how to operate the oven,' etc.... - yeah, that's what I'm working with here!) But there are some very important sections in here that will be very useful - contact information for my neighbors, school information for the kids, etc. I started with a table of contents so I would know how many sections I needed. Then, I started typing! I probably put in too many "emergency contacts," but hey, I'd rather there be too many than too few. I listed out all of our service providers as well - not just for other people to reference, but for me as well that 1 time a year that the power goes out and I cannot for the life of me remember my account #. For the specific weekend I'll be gone, I even typed out what food was already pre-made (hey, you know I'm a foodie - of course I still make all the food even when I'm away!) along with directions/suggestions of places to go around our neighborhood - grandparents love this if they're not local - they'll never find the bounce house dreamland without it.
So, now I have a complete house binder, nicely tucked away in my mudroom. It's great for the couple times a year I need to call the cable company or my septic guy, and perfect for the occasional (okay, REALLY occasional!) times I have someone staying at my place who may not be too familiar with our day-to day (what time the bus comes, what the alarm code is, the amount of buttons one must push to get the TV from a DVD to Netflix, etc). Maybe now I can get away more often! (Right, I know, not happening... but when I imagine it, it's so nice!!!) This week I hosted another back-to-school freezer meal workshop - and this time around we did breakfasts! I love having nutritious breakfasts already pre-made. It saves SO much time in the morning (they take about 20 seconds to heat up in the microwave) and I know my kiddos are heading off to school with something good in their stomachs. We mostly just did the basics - batches of whole wheat pancakes (peanut butter pancakes and blueberry pancakes too!) and a ton of whole wheat French toast. We also scrambled up a bunch of eggs (one batch with ham and another with sausage) and put them into tortillas for some protein-filled breakfast burritos. All you need to do is wrap these up in plastic wrap/ziplock bags and freeze them. My kids choose what they want the night before and we lay it out in the fridge and it's perfectly thawed by morning! Another thing we made this time around - breakfast cupcakes. These fit perfectly into English muffins for breakfast sandwiches (my kiddos like an additional cheese slice melted on top if it's in a sandwich) or you can even eat them plain like mini-omelets! This is pretty easy, all you need is a muffin tin, eggs, and any cheese/meat you want to put in (we used shredded cheddar, ham, and sausage). I used 9 eggs for a 12 muffin tin. Just mix the eggs with a splash of milk (like you're making an omelet) and grease your muffin tins (trust me, you want to grease them good or they are a pain to clean out! :). Pour in the eggs so the tins are about 2/3 full. Add in your chopped up meat and some shredded cheese on top. Bake at 375 for 18-20 minutes. Let cool and scoop out with a plastic spoon. Wrap or place in small plastic bags and freeze! Lay out the night before to thaw (just like the other breakfasts) and then reheat in the microwave the next morning and eat! My kiddos like them because they are "cute," but I love them because they are so healthy and I know they are very filling since it's all protein (and yes, I eat these myself for breakfast pretty often too, so they don't have to just be for your kiddos! :)
Raising independent children is challenging when you're an OCD/control freak like me - so I'm constantly looking for ways to give my kids "control" of their own choices - while limiting those choices to things I approve of. Brilliant, right? For example, my kiddos get to pack whatever they want for their school lunch - from a list/bucket/fridge drawer of foods I've already pre-selected. See what I did there? I have also done the same thing with their closets, and it has worked out marvelously. I've never been one of those moms who can just send their precious toddler out in mismatched prints and different shoes. I just don't have it in me. And you don't even want to see the way I cringe when a grown man walks in front of me in plaid shorts and a striped shirt (did his mama teach him NOTHING?!) So this is the perfect compromise - the entire bottom shelf of my kids' closets are all for them - they can pick whatever they want to wear to school each day... However, I've already pre-organized all of the outfits so they at least coordinate. So here's how it works - after laundry, I group the clothes into pre-organized outfits and then hang them. All the kid has to do is pick whatever they want to wear and grab off the hanger for dressing. My son is only 5, so take a closer look at his: I literally even have his socks attached onto the hanger so the entire outfit is set and good to go. They literally need to just walk to their closet, pluck off a hanger, and get dressed. (Side note: I have bins in their closets as well for their underwear, and bike shorts for my daughter for under her dresses - those they get to pick out themselves because they are hidden from eyesight... :)
So after my recent back-to-school freezer lunch workshop, I have been overwhelmed with requests to do a freezer breakfast workshop. And of course if you know me - I just can't say no to another opportunity to gather with wonderful people, food, wine, and cookie dough (all staples at every single workshop/girls night). So local friends, mark your calendars for Monday, August 24th at 6:30 for a freezer breakfast extravaganza! Here's the menu: whole wheat French toast, whole wheat pancakes, peanut butter pancakes, blueberry pancakes, egg & ham burritos, egg & sausage burritos, egg & ham English muffin sandwiches, and egg & sausage English muffin sandwiches. All of these things are so easy to prepare in large batches - then you just freeze, pull out the night before to thaw, and reheat for about 15 seconds in the microwave the next morning!
If you have little children, this means you have 1.4 million art supplies roaming around your house, procreating and multiplying when you turn your back. Some nights after I look around the clutter that has replaced my dining room table I have nightmares of being choked out in my sleep by 1,000 broken crayons. Maybe that sticky spot on the counter is jelly, sure - but more likely it is one of our 42 glue sticks that all miraculously repel their closing caps. First I tried an "art caddy" - you know, one of those cute little buckets filled with all of your art supplies that you can carry around - but of course that just overflowed and dumped all over the floor. So, I then confiscated an entire kitchen cabinet area that could be utilized as the perfect home for these art supplies - but of course this turned into me being hit in the face by a tower of mis-capped markers every time I opened it (what is it with kids shoving things haphazardly into a cupboard?! Oh wait, that was ME who did it when I was quickly cleaning up at the end of a long, exhausting day?! Okay, I deserve the marker streak down my nose for that). But finally, FINALLY I have solved my art woes. All for the low discount price of $24. Meet the art cart: The best thing about this cart is that there are 10 separate drawers so everything can be nicely organized/sectioned off and I can fill the drawers with additional organizing trays to keep things in order! Each kid gets a drawer for their prized artwork (if it doesn't fit, they have to pick and choose what to keep - this helps teach them that we only have so much space for their 107th cat drawing...) and the cart is on WHEELS. This is genius. If you have something stationary, then the kids have to carry their art supplies to the other side of the house, dropping at least 3/4 of their items all over the floor before they get to their destination (my couches do not love this, and I do not love retrieving dust ball-covered items out from under them). So, we can roll this sucker to wherever we're crafting (kitchen counters, dining room tables, etc) and everything they need is accessible, and then when we're done it's super easy fast cleanup. Then the cart gets shoved back into the coat closet, out of sight: To help the kids keep this organized I've made some simple labels for the different drawers (if your kids can't read yet, cut out pictures of crayons and markers and stamps and use those instead to help them find the proper homes for their supplies) and BOOM! No more art supply tsunamis causing devastation and destruction in every room of my house. Here are the labels for the cart:
Now stop stepping on rogue googly eyes and marker caps in the middle of the night (those really hurt, right?!) and go get organized!!! :)
Just in time for kids heading back to school, I hosted a Girls Night In where we made months worth of freezer lunches! It was pure awesomeness. We had wine, cookie dough, and a bunch of stations set up for people to make various lunches, wrap/seal them, then take them home for their freezers. All you need to do is pull an item out the night before and it's perfectly thawed and ready for your kid's lunch. Here are the stations we had set up: *Turkey & Cheese - we made turkey roll-ups (take a piece of string cheese and cut it in half, then wrap 2 pieces of turkey around each half and roll!), turkey & cheese subs on hoagie rolls, Hawaiian rolls, flatwiches, and tortilla wraps. *Ham & Cheese - we had cubes of ham and cheese for kabobs, and also deli-sliced ham for sandwiches, hoagies, flatwiches, etc. * Salami & Cheese - we made roll-ups (wrap the salami around sections of string cheese) along with sandwiches and Italian tortilla wraps. * Peanut Butter & Jelly - we put this on tortillas (I swear that tastes better than you think, your kids will love it!), Hawaiian rolls, hoagie rolls, and flatwiches. *Mom Poweritos! - For working moms, or moms who just like a quick, healthy, pre-made lunch, these are full of fiber and protein and are made ahead! We used diced smoked chicken, refried beans, black beans and cheese in high-fiber/low carb tortillas. Mmmm! List of Supplies/Shopping List: Ham steaks (cube up ahead of time), cheese cubes, deli ham, deli turkey, salami, various cheese slices, string cheese, peanut butter, various jellies, wheat flatwiches, Hawaiian rolls, hoagie rolls, tortillas, cooked/diced chicken & various beans for the Poweritos with shredded cheese, snack-sized ziplock bags, plastic wrap, gallon-sized freezer bags, and stickers for sealing. Freezer Lunch Tips: ~ Wrap/seal everything tight. You'll go through a lot of plastic wrap and a lot of snack-sized plastic bags, but this will help them not to get freezer burn. Wrap each lunch portion tight, then store altogether in larger freezer bags and label them. ~ If you want condiments on your sandwiches, put them BETWEEN pieces of meat/cheese. You don't want the condiments on the actual bread or it will make the bread soggy when it thaws (the other option would be to spread butter on the bread first, then put your condiments on and that will also prevent it from getting soggy, but I wouldn't want that much butter on my kids' sandwiches if it's not necessary). ~ For little ones, use a sticker to seal the plastic wrap - this helps them open it come lunch time (otherwise if you give a 5 year old a tightly plastic-wrapped sandwich, it's going to take them 12 minutes to find the opening to unwrap it... ask my daughter, lol). ~ Label the bags - these items all look surprisingly similar when they're all wrapped up and stuffed tight together in gallon freezer bags! I'm ashamed to say my camera ran out of memory space so I don't have many pictures of the actual workshop, but this was the gist of it: Everyone got a hand-out with a list of the various freezer breakfasts/lunches I make ahead of time, along with a helpful guide to getting your kid to pack their own lunch (my kids really, REALLY love this!) and you can download those for yourself here:
My kiddos are still pretty little (translation - if they were instructed to clean a mirror, I would still have to clean the same mirror after they were done smearing paper towel streaks all over it) but they're at the point where we want to start introducing them to a little more household responsibility (how many more years until they start paying rent?!). Thus, it's time to start the Chore Chart. Now although someday I plan to have a full "Command Center" with fancy clips and rewards and colorful chart markers, we're taking this slowly (although you bet I will post a more in-depth version down the road)! This is more to get them into a routine of what's expected of them daily, along with introducing them to the almighty power of an 'allowance' of sorts by volunteering for bigger jobs. So here's something very easy you can do to get started: Put together a list of things that should be happening on a daily basis - whether you put routine things like "brushing teeth" or "getting pajamas on" for super little ones, or school related items like "pack your backpack," "pack your lunch," etc. The motivation for little kids to be able to check off a box is still exciting, so even though they may already be in a good routine with some of the basics, it will help motivate them with more complex tasks (or ones they don't find to be as exciting, like... cleaning ANYTHING). Start offering them bigger jobs too - it's a great way for them to slowly be introduced to chores they will be doing regularly as they get a little older.
Make a point to let your little people mark off the chore they completed, or if your kids are competitive, you can even turn it into a contest of sorts. But the more they are involved with the actual chart, the more fun and ownership they will have of it. So start off easy - anything too overloaded will be overwhelming for them - and then let it grow as they do. :) Little people + art supplies indoors = total panic for me. Sure, the package SAYS it's "washable," but my throw pillows from Pier One strongly disagree. So we decided to throw an outdoor art party! Way less anxiety for me, and the little people could just wash up in the kiddie pool when they were all done! Kind of brilliant, right? First let's talk food (always my favorite part): We had a "sculpt your nacho masterpiece" bar along with other delicacies, like Rembrandt's Rainbow Pasta Salad (see prior blog post on dying your noodles - so easy and fun!), Andy Warhol Beans (killer food sign for that one!), rainbow fruit bowls, Michelangelo's Meatballs, Picasso Pinwheels, and Rice Krispy treats that looked like paintbrushes: We had various art stations set up outside - the food tables had a paper runner the kids could color on, they could paint a rock, there was a mask making station... So much fun! I usually keep the décor pretty simple for parties, especially when they're outside events. I printed off a free banner from Google (an easy DIY item you don't have to pay for!) and found these cute picture frames for $1! (You could also make these inexpensively, just cut colored pencils and glue them on a cheap frame, or even do it with crayons to keep it simple and colorful! :)
|
AuthorI love writing romance novels, editing other people's novels, planning parties (heavy on the theme food!) and watching movies. Cooking has also become a passion of mine (because you can't have a proper party without food!) and I love finding new hobbies when I can squeeze them in. Archives
December 2020
Categories |