Since it's the last day of the month, that means it's time to organize next month's meal plan. As usual, there are items on the menu each week that are "interchangeable" - something in the freezer/pantry that isn't fresh in the fridge. That way if something else comes up or plans change - I'm not wasting any food. Also, my other important meal planning tip - cook twice as much meat for a meal, and use it a day or two later for another dinner - this saves a lot of time because the meal is already half cooked and ready to go. For example, I may cook a family pack of ground beef (which is already cheaper than just buying the 1 pound package needed for the meal) and then I'll use it one night for Mexican food and another night for a meaty pasta sauce. This makes week-night meals sooooo much easier! 
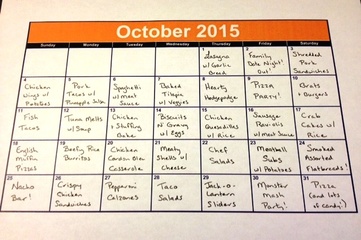
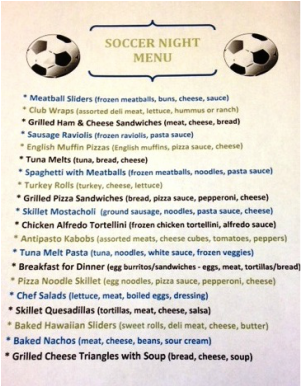
Here's what's on the menu for October. I love some of the "fall" recipe items I have on there - Hearty Hodgepodge, Chicken Cordon Bleu Casserole, Jack-O-Lantern Sliders, Chicken Stuffing Bake... More on these recipes to come soon with my Fall Tasting Party blog entry and my Halloween-themed foods post! Stay tuned!
0 Comments
FALL is my absolute favorite time of year (<--editor's note: she says that about every single season) - changing out the closets to warmer clothes (any excuse for me to wear leggings is a win!), pumpkins, football season -- and apple picking. It's one of the things my family looks forward to most every year. Just look at the joy on this face: That's totally worth buying 84 apples all at once, right? Especially the ones with brown worm spots on them because the stem with the little leaf hanging off was just "sooooooo cute" (according to a 7 year old girl I know...:) The actual 'picking' part is fantastic. We even found some delicious blackberries and raspberries still in season: And even some fresh green beans for our pet rabbit Copper! Then we got home and realized too many people were carrying their own bags of apples. My bad. There were literally dozens, and dozens, and dozens of apples. SO, it's now that time of year where I'm making up creative ways to USE all of those apples! I hate to say it, but I'm not big on making apple desserts - how many pies do you expect me to eat in a 2 week period?! I just can't do it. So, here are some eclectic ways to use apples in salads, appetizers, and dinner - it keeps things healthy without 14 cups of sugar for all those pies, and it uses up all of the apples falling off my kitchen counters!
The best part is - by using up all of these apples in a relatively quick amount of time - that means we can fit in one more round of apple picking before the season is over! Woot woot! :)
Ah, the first day of fall - which means I am now blessed with soccer practice/soccer games 3 days a week. It's really not so bad - the kids love it and I love getting out of the house (for the first 2 months before we're sitting through a whiteout snowstorm - those games are less fun for me...) But that means 2 nights a week, I have about 20 minutes to make dinner and get it in my kids faces before we go to practice. Now don't get me wrong - as a freezer food lover, I am usually pretty prepared for this. I am well stocked with pre-made meals, wrapped frozen chicken burritos, homemade pasta sauce perfectly portioned out and frozen for such an occasion... But somehow, every once in a while (let's go with "seldom" - doesn't sound so bad!) I mis-plan our week (or get caught up in PTO meetings, new parties to plan, etc) and I'm left scrambling for a last minute dinner idea. SO, I've compiled a list -these are all dinners I can make in about 15 minutes or less (usually boiling noodles is the timeliest part) and my kids love them - AND, I usually have ingredients for all of these dinner on hand already - bonus!! The other perk - these meals only have 3-4 ingredients - so nothing complicated. And by keeping this list handy, I'm able to steer away from making the same exact thing on those busy nights. Want a PDF so you can print this list for yourself? Poof:
Most of these dinners are probably pretty self-explainable - but if you have any questions on any of them, just shoot me an email at [email protected] - off to practice!!!! :)
I don't have a green thumb at all. Some people say I have a "black thumb," because I manage to kill every single beautiful plant/flower I've ever cared for. I even manage to kill succulents, which my mom says is impossible. I would say, more accurately, I have NO thumbs. That's how bad my gardening skills are. The front "landscaped area" of my house is self-sustaining - I don't water it and things live. That is MY kind of gardening. But unfortunately, that means my whole front yard is just a few green shrubs (I swear those things will still be alive after World War 3) and a couple trees that are somewhat green (then brown by fall). SO, the upside is everything lives - the downside is I have absolutely NO color in front of my house (other than a 2 week period where some of the leaves on one tree turn red - it's a glorious 2 weeks - and I swear no one even drives by during that time to notice it). So, this began my quest for COLOR in my front yard - but something I couldn't kill. Garden gnomes weren't an option as I'm not eighty years old yet. The only thing that wasn't brown/green in front of my house was the birdbath - which was a beautiful muted cement color (<-- note the sarcasm). BINGO! So..... this happened: Yes! For the low-low price of a can of spray paint, I finally have a pop of color in my yard! And it can't die!!!! Per the expert at the hardware store, here's what I used: All I had to do was lay a tarp down in my garage, spray, then let dry. Yes, it was THAT easy!! Then my husband took away the spray paint before I started looking around for other things to spray paint (apparently there is a limit as to how many things can be teal in your front yard...) One awesome note - because I was just painting cement, there was no prep work involved (bonus - if you don't have a birdbath already, the plain ones are even cheaper than the already painted ones - and then YOU get to pick your own color!) So just a few minutes of work, less than $10 for some good spray paint, and poof, finally some color in my front yard that I can't kill! Whoo hoooo!!!
If you've never heard of this kid show, stop reading now - otherwise this is just going to be weird for you. I will say though, out of all the strange kid shows out there - I thought this one was actually pretty cute and it was the single only show my toddler ever wanted to watch. So (this is a bit of a throwback post to a time before my parties were really epic) but here are the highlights in case you have your own Gabba-themed party (or even some kind of 'monster' party) coming up! :) First off, I did NOT make this cake. My talents have limitations (<-- severe limitations!) but I simply printed a picture of the characters off the internet, took it into Target, and BAM, for the low price of $25, I got myself a character cake. The kid was thrilled! The food table had a big sign that read "There's a party in my tummy!" (See, told you this post only helps if you know the show... :) and we kept it simple with sandwiches and finger foods. The watermelon was supposed to look like Brobee - maybe not a perfect replica, but the kids loved in and could scoop their fruit out of the back of the head. Totally killed it amongst the littles. The kids also loved the Muno pretzel rods! I just used red candy melts, dipped the pretzel rods in, stuck on a candy eyeball, and let them dry in a coffee mug. These only took a few minutes to make and the kids were obsessed! You could also use these for "Monster Mash" parties for Halloween, etc. So cute and easy to do!
To make it on my list as a "super snack," the snack must hold 3 important characteristics: it has to be moderately healthy, my kiddos have to love it, and it has to freeze well (that's usually the deal breaker with a lot of snack ideas out there! :) Most days my kids get a freshly made snack (of course neatly laid out in the "snack shack" as they call it - future blog post coming on that!). But it happens all the time where I need a go-to healthy snack that may not be something I don't currently have on hand. So, I like to batch freeze snacks too so that we always have plenty of options. These also come in handy during the week when we have early/late soccer practices and it messes with our dinner schedule. Most of my ideas are simple - ham and cheese cubes in a snack-sized ziplock bag, frozen, then thawed in the fridge the night before and I put them on frilly toothpicks to turn them into mini kid-kabobs (yeah, bonus points for fancy snack presentation). Another idea - I take a piece of string cheese and slice it down the middle length wise - I wrap 2 pieces of deli turkey around each piece and freeze in a ziplock bag (same idea, thaw it in the fridge the night before) and then right before the kids get off the bus I slice them up (like a pinwheel) and put them on whole wheat crackers. The kids loves these, and it's perfect for when I don't have fresh deli meat lying around. I also love pizza pockets with crescent rolls - just a little pizza sauce, quartered string cheese, and bake - these freeze well and once they're thawed, all you need to do is microwave them for about 20 seconds and serve! Here's a new one I tried yesterday, this is a pretty simple one! Here are the ingredients: Yep, pretty easy! I made a really large batch so I could freeze a bunch of these, so I mashed 5 bananas, mixed in 6 packets of instant oatmeal (my kids won't eat oatmeal plain, so this is a bonus way to use those up!) and added 1/2 cup of peanut butter. The "batter" was actually pretty good - although next time I might add just a tad more peanut butter, simply because I'm a believer than you can just really never have enough of it.
It's always been a dream of ours to have a "home theater" in our house. Once you have kids, you just really can't get to a movie for like, 5 years. And even then, you're seeing animated G-rated stuff for many years after that. OR, you're getting a babysitter and it ends up costing $97 just to leave your own house to see a flick. Torture, right?! (Good thing those darn kids are somewhat cute.) So, after much planning, and even more SAVING (<-- see, more years of not going to a theater!) we finally did it. We designed our "dream" home theater. When we first bought our home, here's what the basement looked like before we moved in: Yeah - pretty horrible, right?! But there was soooo much potential - beautiful windows/sliding doors, everything was already framed (translation = LESS money needed!), and we had a good amount of space to use. So, we started planning. Hello Pinterest! We knew we wanted a few things: a double row of reclining theater seats with a pub-high table behind it for 3 rows of seating (and a place to eat while watching!) and my husband did some heavy negotiating for a Guinness bar and a shuffleboard table (thank you, Amazon). I didn't want the expense/hassle of actual plumbing down there (there is already a kitchen in another room down in the basement, so it really didn't seem necessary - and a HUGE way to cut costs) but I did want some type of "concession stand" area for food. We also wanted a cool ceiling with tin panels and awesome lighting (thank you, electrician father). So, here's what we came up with: Here's the shuffleboard area and the "concession stand" set-up: We could NOT possibly be happier with how everything turned out! We use the space all the time for movie parties, sports-viewing gatherings, and we have family movie night every Sunday with the kiddos where we get to eat dinner and watch something together. It is AWESOME. For those of you thinking of something similar, here are some things we learned/ways to cut costs:
For the tin ceiling panels, those run about $20 a panel at the hardware stores. I actually found these PVC ones online (which are even BETTER because there is no rattling from the speakers!) and they were only $10 a panel. For the runners between them, we bought plain white (cheaper! :)and simply spray-painted them a darker color for a warm contrast. The ceiling is one of my favorite parts of the entire room! For the "concession stand" area, it would've cost us quite a bit to do a "custom" job since the pre-existing cutout in the wall was an unusual depth - instead, we just bought standard cabinets and set them out about 6 inches from the wall - we still have plenty of storage space in them and no one would ever know there is just dead space behind them - an easy way to save some money! We obviously contracted out some of the work (we are just not those people!) but we did what we could on our own. Taking care of all of the painting (not fun, but saved almost $2000 from an estimate we got!) was another way to cut costs. So, from our "idea board" (we seriously started planning this before Pinterest existed, and we would cut out ideas from magazines and put them on a corkboard) and some heavy duty saving, we finally have an "entertainment room" that we couldn't love more. Which means... now I'm looking forward to my next house transformation project!!! (And I'm able to save up for that now by not having to pay for a babysitter anymore just so we can go to a movie! :) |
AuthorI love writing romance novels, editing other people's novels, planning parties (heavy on the theme food!) and watching movies. Cooking has also become a passion of mine (because you can't have a proper party without food!) and I love finding new hobbies when I can squeeze them in. Archives
December 2020
Categories |