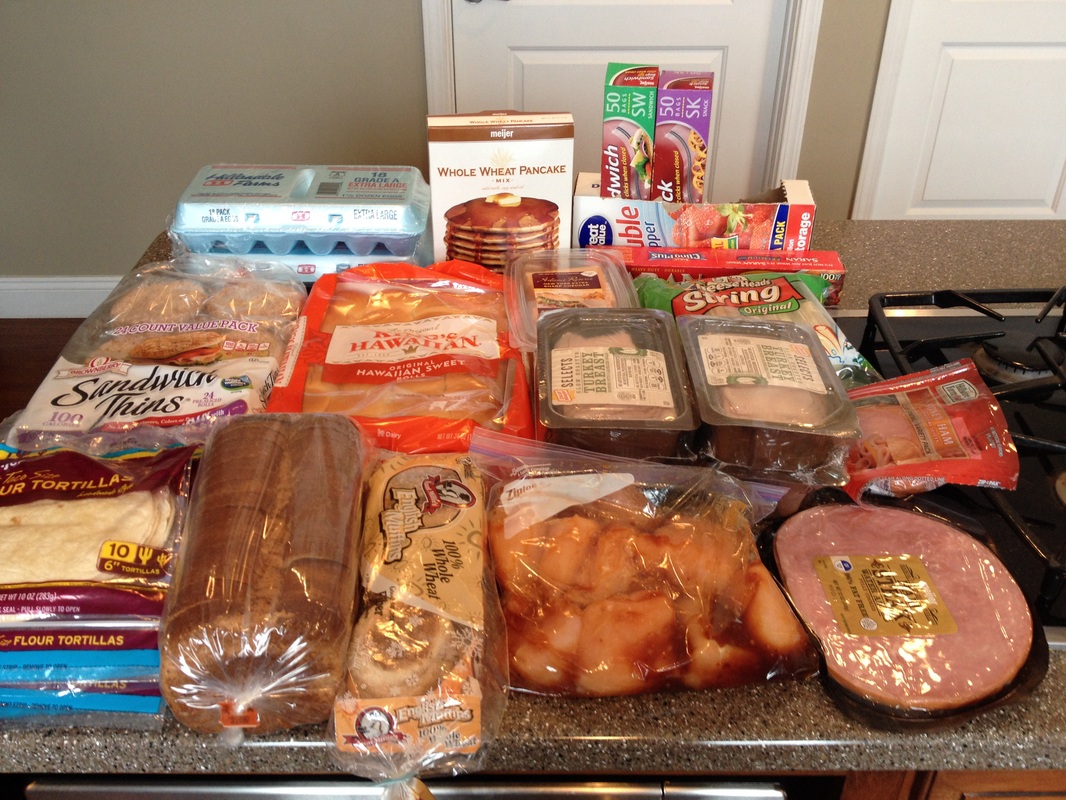
I should be ashamed.... So very, very ashamed. My pantry should have a revolving door on it given how many people are in and out of there every day - my kids, the neighbors, the neighbors kids, the guy selling magazine subscriptions door-to-door (yes, he gets a snack too - I'm a good host! :) - so naturally things are continually being jumbled around in there as a 4 year old looks for the right kind of granola bar. One day I opened up my pantry and realized the horror it had become: 
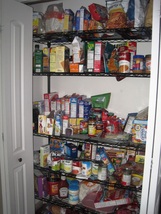
Please don't click to enlarge that pic - it's truly awful! So obviously I had to do something about it. Now as much as I love those Pinterest pantries with beautifully labeled glass jars everywhere, that's just not going to work for me - we go through cereal and pasta faster than I can refill every jar. So instead of making it "pretty," I was just shooting for functional. I want people to know where everything is without asking - so, I simply grabbed some bins from the dollar store, made a few easy labels in Word, and organized. Turns out in under 45 minutes (including a hefty sweep of the floor after taking everything out!) I was able to make the panty far more functional (and a whole lot more tidy!): 
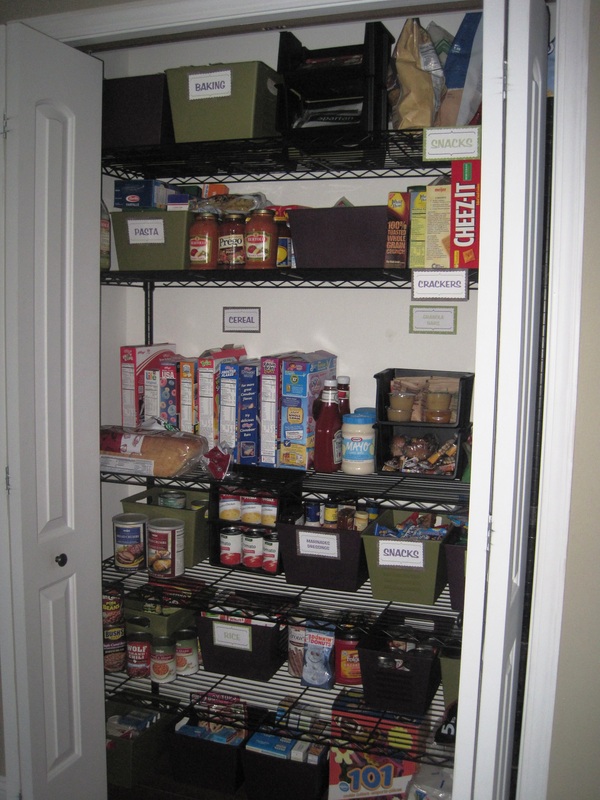
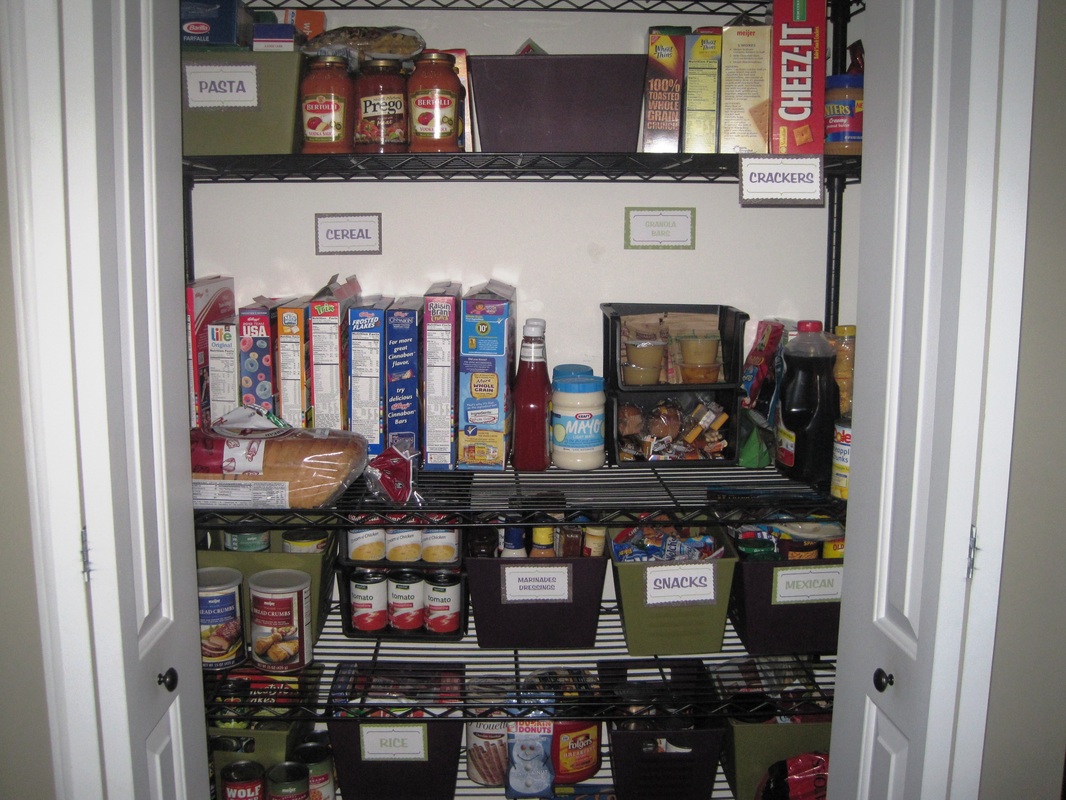
My children can now find their breakfasts, my husband doesn't ask where the tortillas are, and my food labels are front facing enough to calm my touch of OCD. *Sigh.* So here's your motivation for the weekend - get some bins and gut your pantry (you'll be surprised at how many meals you can probably make out of what you already have in there!) and get organized! It's such a simple little project, but it will make your life so much easier. :)
0 Comments
I love a good superhero party - lots of bright fun colors and easy theme kid-friendly foods! Some are centered around one particular hero, but the last party I hosted included them all. The décor was simple - I cut out some clip art shapes, used some teacher supplies from friends, threw together a name banner, and used a little black and yellow construction paper to make the city backdrop behind the food table. As you probably know by now, I love themed food and cute little food name cards. The menu: Batwiches (PB&J cut into bats), Hulk's Hero Chicken Sandwiches (shredded BBQ chicken in a crockpot), Black Widow Meatballs, Spidey Dog Bites (pigs in a blanket), Ant Man Ants on a Log, Dare-Deviled Eggs, Captain America Pinwheel Shields, Thor's Hammers (pretzels with cheese cubes like a hammer), and Cat Woman Claws (Bugles). For the dessert table, we had a giant "G" cake in the Superman logo, and I made some easy Comic Cookies: I also made a little Superhero dress-up station for the kids who wanted to dress up (although most of them came in costume already!) I found some great cut-out masks (free printables!) on the internet and I just used ribbon to tie them together. For the capes I simply bought some cheap red and blue fabric and used self-adhesive Velcro squares. The kids loved wearing them around, and many asked to take them home! For printables, menu ideas, and recipes, send me an email and I will hook you up! :)
Most of the moms I know hate packing lunches - either they dread the time it takes, they're never sure what food they have in the house, they get into a rut packing the same food every day, etc. I absolutely LOVE making lunches - mainly because I only do it a few times a school year and my kid actually does the packing using my "system." Let me enlighten you.
The gist of the packing is simple - I prepare the main course (most of which is already made and in the freezer, she just chooses which one she wants) and my child grabs one item from each bin - she likes that she is "choosing" what she eats, but I like it because I have control over what is actually going in there. The easiest way to prepare for school lunch (and healthy breakfasts!) is simply: batch freezer preparation. I helped a friend through this recently, and it was a lot of fun! Here were our supplies: All of this cost less than $70, and this is enough food to make over 90 lunches items and over 90 breakfasts! We split everything so it wouldn't be too overwhelming (along with a bottle of wine... :) and the end result (this is just a small portion of the food we made): For lunches, we made: turkey cheese roll-ups (just deli meat wrapped around string cheese - my kids LOVE these), turkey & cheese wraps, peanut butter jelly rolls ups (in tortillas), turkey & cheese flatbreads, chicken & cheese quesadillas, ham & cheese kabobs, turkey & cheese subs, and chicken & cheese kabobs. For breakfasts we made: whole wheat pancakes, egg burritos, French toast, and egg & ham sandwiches on whole wheat English muffins. Everything was individually wrapped (except the pancakes and French toast - I put several in each ziplock and separated them with wax paper) and for the lunches, I put a small sticker on the crease of the plastic wrap so they are easy for little ones to open. Everything gets labeled and it goes straight into the freezer. The night before a school day, my daughter picks her breakfast and lunch main course (just put it from the freezer into the fridge overnight), and it's perfectly thawed in the morning! The rest she chooses herself as well out of the pre-labeled/loaded bins and that...is....it! So easy, all nutritious, and it's a win/win for both me and my child - she gets to be independent and "choose" what she wants to eat, and I have it all made ahead of time. Questions? Suggestions? Want some easy recipe ideas? Email me! :)
A food for any party theme - veggie cups. Sure, you could always do a traditional veggie tray - but if you're short on "theme" food ideas, this is such an easy solution - and you can have the cups decorated ahead of time! The food labels are endless - I have used veggie cups as "animal whiskers," "superhero spears," "Power Ranger swords," etc. Or you can simply put an event logo, monogram, product name, etc on them. The nice thing is, you can either buy pre-cut veggies for time constraints, or you can just cut up and prep the veggies the night before so they're done. That way all you need to do right before the party is fill the base up with dip (I like a simple pre-made ranch dip, but any veggie dip is fine) and then you put the pre-cut veggies in the decorated cups and that's it. So easy! Plus it fits your theme, everyone likes veggies (or at least it makes you feel good offering them to the kids who may not... :) and they look really pretty on a table (also a perk!) For starters, cut out what you want on the cup (for example, see the pics below from a "little man" party I did for a kid's birthday - I simply cut out some printed free clip art tie pics) and I used small glue dots to attach them (mess free!) - you can stack them right back up until you're ready to use them so they don't take up much space. Then fill them up for the party and you're done! Super easy, super fast, super cute - and moderately healthy. :)
Here's a quick little project for you to work on over the weekend - freezer meals. I absolutely swear by these - they are easy to prep in large batches, it doesn't take much time, and all you need to do is pull out what you want a day or two ahead of time and it's thawed and ready to cook. For this round, I kept it very, VERY simple. Meat, marinades/sauce, freezer bags - that's virtually it. In a little over and hour, I was able to prepare 18 meals! Keep in mind I'm just talking about the "main course" here - when I prepare these, I'll still throw together some noodles, veggies, etc, but at least the bulk of the work is done. The most economical way to do this is to buy meat that is near the "sell by" date - I was able to get chicken breasts for $1.29/pound, and still had 2 days before the "sell by" date ran (if you follow those kinds of guidelines of course, lol). I also got a good deal on the steak. Otherwise, at least go to a store where the meat is already on sale that week, and stock up. Make your freezer meals based on whatever is the most economical that week and it will save you a ton. I cut up almost 20 pounds of chicken, putting them into gallon-size ziplock bags. I used our favorite marinades (general Tso's sauce, teriyaki, sweet and sour) along with a couple new ones that were on sale (I buy marinades when they're only .99 cents and I stock up!) For a few of the bags, I threw in pineapple for Hawaiian chicken, and you can also throw in frozen stir-fry veggies as well. I also bought some ground beef in bulk on sale - some was cooked/divided for burritos, some went into pasta sauce, and some was converted into delectable hamburgers. Here are the bags: I like to double-bag them, just to be certain I won't have a leak. When you freeze them, lay them down as flat as possible - this will maximize your freezer space. To thaw, just put them in for fridge for 2 nights, pull out, and then either grill/bake/stir-fry/crockpot it and you're done! That's all the space it took up in my freezer for 18 meals! (I get 2 meals out of each bag - I have become a leftover creative genius - chicken that goes in pasta one night goes in Mexican food the next day, and no one even knows it's the same chicken they ate the night before. :)
It's finally done!!! My 3rd novel, Six Reasons, is finally up and running on Amazon.com. My beta readers unanimously told me it was their favorite book in the series, so hopefully everyone else loves this book as well. I feel so excited to complete the stories of these 3 females, and I am so very thankful to all of you who have taken the time to read them. It really means a lot to me. If you haven't done so yet, please make sure you leave a review on Amazon.com - it can be short and sweet, even just a sentence or two if you'd like - those reviews help me out tremendously, and I would really appreciate it. I am taking a brief writing hiatus over the next few weeks to work on some editing projects - I have been blessed to be entrusted with other people's books, and I think that's really awesome! Plus I like feeling like a high school English teacher, marking up their work with a red pen. :) Then I will be back at it in March with a new book. My cover is already done for that one and I absolutely LOVE it. I will be sharing that soon, so keep checking back for updates!
If you have a little girl, you are probably familiar with the Pinkalicious books. The basic premise is about a girl who eats too many pink cupcakes, turns pink, has to go to the doctor, is prescribed a diet of green foods, then viola, she is better. I started off by making pink cupcake invites - they were so cute, and were much easier than I thought! I drew a cupcake template (or of course you could trace a cookie cutter or something, but you need 2 parts - the outline of the cupcake, and the "frosting" on top). I found some great cardstock at Hobby Lobby (the base looked/felt like an actual cupcake wrapper!) and I embellished the cupcake with some ribbon and sequins to match the Pinkalicious cupcakes from the book. The invite opened up just like a card, and I had all of the party details printed inside. I made a backdrop for the food table with large pink flowers and butterflies (a scene in the book) and it came out beautifully (all you need is some printed paper and some scissors!). The food was fun - all pink foods on one side, and green foods on the other to cure your "pinkitis." Surely there aren't many pink foods, right? Wrong - you can make plenty of foods pink with a little creativity. Pasta salad is always a go-to for me (I used regular penne, but then dyed a bunch of bowtie noodles with red food coloring, which came out pink). Because the party was for little kids, we also had strawberry applesauce, pink pudding, yogurt parfaits, etc. The greens were mostly veggies, fruits, chicken club wraps in green tortillas, guacamole, etc. Then there were desserts - lots and lots of desserts. I made some cookies to look like the pink cupcakes and I also made bouquets of marshmallow pops - always a favorite with kids. I usually don't post pics of the cakes, because I DON'T make them, however I design them (translation - I draw what I want on a piece of paper and I hand it to the Target bakery lady). I am always impressed with their finished product, and they always come out exactly as I hoped. I love doing cupcake cakes (see pic, that cake is made entirely out of individual cupcakes!) which is nice for serving purposes. Check out the pics below, and if you want some further menu ideas for this type of party, just email me. A lot of my party recipes are made ahead of time and they are very low maintenance the day of the event - my favorite kind of party food. And I can make an entire "dessert bar" in under 20 minutes - let me know if you want in on my secrets. :)
I absolutely love black tie events - probably because my real day-to-day life isn't all that fancy, so any excuse to get dressed up and eat fancy finger foods is fine by me. Every year we host an annual Oscar party for other movie-loving people. We spend the weekend watching the nominated movies, and then we have a swanky red carpet party for the actual award show. The party planning starts with a very simple hand-made invite - there is no need to make this party expensive. With a little black cardstock, some leftover ribbon, and a little clipart from the internet, it's easy to make some simple Oscar-themed DIY invites. The main invite includes party details - the enclosures include an RSVP card, a voting card as to which movies the guests are hoping to watch as part of our preview night (majority wins) and a rough itinerary as to what they can expect for the weekend. Really, an invite is easier than you think - last year I did pocket-folds, this year I had some time constraints so I made them even easier - they took me a total of 12 minutes to create start to finish. The other important details - food. I REALLY love appetizer-themed food - it's pretty easy to make, most of it can be done/prepped ahead of time, and it just looks cute. These food pics are from our party last year (I am still currently brainstorming for our party this year - I like to change things up year to year). I cut up a star fruit for all of the drinks (yes, every year we have a list of Oscar movie-themed cocktails :). The appetizers: cheese and olive crackers (party hack: use a straw when you need small circles of food to decorate with), caprese skewers, antipasto skewers, veggie cups, and cucumber hummus bites. Our menu for the actual dinner part of the party included steak/veggie rolls - you take a thin piece of marinated steak, throw some sautéed veggie strips inside it, roll it up with a toothpick, then smoke it until cooked through. They were amazing! For dessert we had quite an assortment for people to snack on during the actual awards show. Popcorn cups are always a hit, and you can make your own themed containers out of cardstock (or just decorate plain white ones with the Oscar statue). We also had cookie dough dip, brownies, etc. These tuxedo cookies were so easy - I used leftover Tagalong Girl Scout cookies and just piped a little white icing on them from a ziplock bag. All in all, it was a smashing success. The food was mostly prepped ahead of time so I didn't have to worry about anything time consuming the day of the event. Most foods can be cut up/marinated/prepped the night before, and then all you have to do is arrange it on a platter and viola - black tie party complete!
My biggest crutch in life is my inability to choose adventurous paint colors. I walk in to a paint store thinking I will buy some bright, bold color - and I walk out every. single. time. with light tan. Literally, every time. Fortunately the house I moved into was already painted (multiple room paint decisions would be way too much for me to handle!) but the only room untouched was a small playroom above the garage. Perfect. If I'm ever going to experiment with a fun paint color, it should be in a playroom, right? Nope. I still walked out with light tan. It's a curse. But instead of keeping the walls plain and bare, I discovered my love of.... wall decals. It's true that they really peel off without leaving any damage to the walls (I would hate to damage my unique tan paint! :) and it's an easy way to make a boring wall "fun." These trees I got were also really inexpensive (less than $20 for both from Kohls) and the beauty is that as my kids get older, we can easily replace them with a different theme to keep the room interesting every few years. Having a boy and a girl, I figured the easiest thing to do was cut the room in half - one side for boy stuff, one side for girl stuff. This makes cleaning up SO much easier because the kids know which side of the room their toys belong on. And of course the best storage solution of all for kids - BINS. We lined both sides of the room with white cube shelves to match the bench. Then my kids labeled the cubes with pictures we cut out (perfect for kids who can't read - they can just look at the picture of a car and know that is the bin where all their cars go). This was such an easy project and even though every kid who comes over dumps every single bin out all over the place, the entire room can literally be cleaned up in less than 15 minutes, and my kids easily know where everything goes. I was a little worried at first about little guests trying to pick off the stickers (and it did happen a few times, though not as often as I thought!) but we were able to just stick them right back on in place, no harm done. My kids love having a "fun" place for their toys, and I love having a functional room to hide all their junk so things still look neat and tidy! :)
One of my favorite go-to ideas for an adult night in is a wine and cheese party. It does take a little preparation if you aren't a wine/cheese expert, but 20 minutes on the internet and you'll know more than you need to pull this off. The must-haves are simple - various wines and cheeses of course, and you'll need some other finger foods to pair with the wine other than just the cheese. Olives, grapes, and dark chocolate are a few of my favorites, along with some assorted meats (salami, pepperoni, etc). If you're turning this into a full-on dinner party, I would suggest fondue with various meats along with sauces for dipping. The one important thing to do is to help your guests out, as it's likely they have no clue which cheeses should be paired with which wines (unless you have some fancy pants friends of course). I made quick little signs for each cheese, detailing which wines work best. Conversely, you could label the wines instead to let your guests know which cheeses/foods go best. Some people opt to have their guests bring their own favorite wine, or to each bring a cheese. I would side with labeling whatever you are providing as the host to make it easy (or if you're a control freak like me, you just volunteer to provide it all so you know exactly what is pairing with what... :) |
AuthorI love writing romance novels, editing other people's novels, planning parties (heavy on the theme food!) and watching movies. Cooking has also become a passion of mine (because you can't have a proper party without food!) and I love finding new hobbies when I can squeeze them in. Archives
December 2020
Categories |