Hoppy Easter! (<- yeah, I hate that pun too, but it just works...)
Need a really easy Easter dessert that doesn't involve baking? Easter bunny donuts! This is a great dessert craft for a school treat and kids love these. They also don't take a lot of time/effort, so moms love them too. :) 
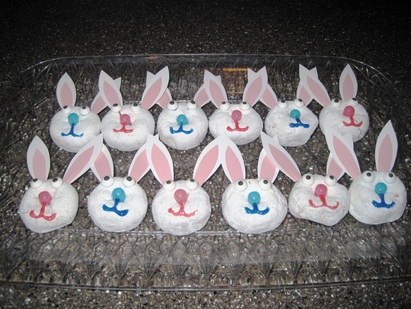
The only tedious part is cutting out the ears, but you can have a little person help you with this. I folded a bunch of paper when I cut them so I would have symmetrical pairs and I could cut a bunch at one time. Make the pink ears slightly smaller for contrast, then glue on the white ones. I used clear tape to adhere them to toothpicks. Stick the toothpicks into the donuts and put on a nose (we used Mike N' Ikes because my kids like those, but most candies can be shoved in the center hole if you want something else) and then grab a frosting tube. (My kid wanted "girl bunnies and boy bunnies," so we did both pink and blue, but you could even use chocolate frosting or whatever you have lying around.) I used a small dot of frosting for the candy eyes (found in the baking section of any store, Walmart, Target, Meijer, etc) and then piped on a mouth. Done! Fast, easy, and no baking!
Hoppy Easter! (<- yeah, I hate that pun too, but it just works...)
0 Comments
This was such a cute party theme for a 1 year old birthday party! I was so happy to help out with this project. The boy's mom already did an amazing job with all of the decorations, the drink station, the cake... I had the privilege of making some desserts, veggie cups (per my past blog posts, you know by now I'm obsessed with those!) and some favor boxes! Here are some of the desserts I made: Theme cookies are always a go-to for me, kids snatch them up. I have a cheap box of '101 Cookie Cutters' (got them years ago from Kohls for $7) and sure enough there was a plane in there! My trick is to always make some "theme" cookies, but then to add a bunch of regular ones too to make the pile look bigger/more diverse. I also had so much fun making these propeller marshmallow pops - they were easier than they look! I simply melted chocolate and put it in a piping container, drew a figure 8 (creative/artistic people could probably free-hand it, but I'm not that talented) and I made a bunch on wax paper and let them cool. Then I frosted the marshmallows, stuck on the chocolate propellers, and used a little frosting to attach a small M&M for the center: I also got to make some favor boxes (they had Nutter Butters wrapped up inside for some "In-flight Peanuts" - I ended up tying some twine around the tops with a little sign that read "Thanks for Flying By!") and I printed some tags for the veggie cups (I adhere them to the cups using glue dots so they stay put, then just fill the bottom with ranch and cut veggies): For more information or a suggested airplane-themed food menu, please email me for more at [email protected].
I always love rooms with a little personalization. Wall letters are such an easy way to do that, and although they are readily available on sites like Etsy, I was so surprised to find out just how easy they are to make! And of course making them yourself lets you completely personalize them for the room. Here's the first set I ever made: Okay, not the best pic, but they are shiny and each letter has kind of a textured looking print (which apparently doesn't show up well in pictures, but they look great in person!) There are literally 4 steps to this easy project. Step 1: Buy the wood letters you want (Hobby Lobby, Michaels, pretty much any craft store will have a nice variety - different sizes and scripts!) and pick out the coordinating paper you want, all one color, all different - whatever matches the room. Step 2: Grab a pencil and trace the letters on the back of the paper and cut them out. Step 3: Glue the paper onto the wood letters, matching them up perfectly, then grab a medium sized paintbrush and paint a layer of Modge Podge over the letters (this can be purchased at the same craft store where you get your letters - you only need a little bottle): Step 4: Once it's dry, hang up the letters! (Or further adorn with ribbon or whatever other embellishments you had in mind...) I am a bit commitment-phobic so I just used command strips for these - that way if I ever decide to change them or move them, there is no mess on the walls.
That's it! It is virtually fool proof (providing you trace/cut the letters out properly) and they look so cute! For a girls room you can hang ribbon on the tops to hang them. The symmetrical part of my brain forces me to hang them straight, but they also look really cute spread out in different patterns if you're feeling adventurous! The easiest part is that you can change them/re-do them if it's not quite the look you want, and the supplies are cheap. Aside from drying time, you could literally complete this project in about 30 minutes! So as you've probably noticed by now, I throw a lot of parties. Girls nights, movie parties, kid birthday parties, etc. My favorite time of the year though: MARCH MADNESS - where I get to feed droves of burly, hungry men. I like burly hungry men because they are pretty easy to please and they are always quite complimentary about hoards of food being shoved in front of them, so it's always a smashing success. Things do get a little hectic with so many people coming and going (family, friends, the neighborhood, my husband's old fraternity - literally) not to mention a few straglers who don't really leave (so we have breakfasts to account for as well) so we have to plan for a LOT of food that is easy to prepare and easy to heat/reheat. Here's the menu for this year, along with recipes for the side dishes: Here's a PDF version if you want to print it:
Questions on any of these recipes? Want more ideas? Send me an email at [email protected]!
I'm obsessed with furniture rehab projects on Pinterest - I'm always amazed that someone can take an old junky piece of furniture and they can transform it into something that fits in their home. I've never tried it before though - because I'm lazy, and I'm lazy. Yes, double lazy. You see those before and after pics and it looks like a lot of work, right? NOPE! To my surprise, this was one of the easiest DIY projects I've ever done. I was given an old (REALLY old!) desk from a friend who was moving - there were names carved in it, scratches all over, etc - the wood was just plain ugly. Like 100-years-old ugly. The project looked overwhelming - did I have to sand it all down? Scrape it somehow? Seal it? I had no clue what I was doing. Well, with a little Pinterest research, I heard of a spray-on paint primer called Zinsser (many stores carry this, Lowes, Home Depot, Menards, etc) - and this miracle product and one coat of paint was all I had to do! This spray primer covered all of the scrapes, scratches, and name carving - I literally just sprayed it on and let it dry for a day. The next day I simply took a paint brush, 1 quart of satin finish paint, and brushed it on. That was IT. I had originally planned on getting some cute hardware for the knobs, but when it was painted I actually loved the old original ones! So I screwed them back on. Since this desk is for a kid, we went with a little storage ottoman for a seat (the seat opens up and there is plenty of storage space for "treasures" inside) - here's the finished product! It took less than 2 hours of actual work time (not counting the drying time of course) and cost less than $25 for the primer and paint. I couldn't be happier with how it turned out, and now that I know how easy it is, I think I have a new hobby! (Somewhere my husband is shaking his head...)
I was asked recently to handle a "tea party" for twins turning one - eighty people attended the party, so it was a wonderfully big project for me! It was also an hour away from my house (which sometimes makes food logistics a little tricky) but since the menu was mostly "finger foods" anyway, it worked out quite well! One of my favorite things about doing parties for other people is that I love to see their own creativity and what they've done - this mom is amazing! When I got there, the room was absolutely beautiful and she had great tablecloths already set up - here's her drink station: For food I kept the menu pretty simple - everything was small and easy to grab. We had mini chicken salad croissants, deli finger sandwiches, meatballs, antipasto skewers, fruit & yogurt parfaits, assorted pinwheels, deviled eggs, mini fruit skewers, cucumber hummus bites, pink bow tie pasta salad, crostinis (I LOVE these - they are just crescent dough cut into squares and you can top them with virtually anything - we had some caprese ones with tomatoes, basil, fresh mozzarella, and balsamic, some with bacon, bleu cheese and honey, salami and cheese, etc... There are endless combinations for those!) and there was a separate dessert table. Here are some of the food pics: I was able to prep almost ALL of the food the night before the party, which is always a goal of mine so things aren't too hectic the day of. I made the fruit skewers, chicken salad, antipasto skewers, and crostinis ahead of time and just kept them tightly wrapped in the fridge until the party. I had the pink bowtie pasta noodles dyed the night before as well (more coming on that! :) and the pasta salad was made the night before (just add a little ranch right before and stir and it doesn't dry out!) and all of the fruit was cut up for the parfaits. So the morning of the party, all I had to do was turn on the meatballs in the crockpot (General Tso's sauce from GFS has quickly become my favorite marinade for ANYTHING, but in a pinch I also often use ketchup, brown sugar, and a little BBQ sauce for the meatballs) and I spooned the yogurt into the parfait cups ($1 store for 10 packs of those!) right before the party (the only last-minute prep I had to do - this could be done ahead of time if you have enough fridge space, but since I had to travel for the party, I had to do it there). I also whipped up some finger sandwiches while I was there as well (God bless Hawaiian rolls, those can make any finger sandwich taste delicious!) and that's it! The total food cost was $220 and fed 80 people with some great leftovers for the exhausted parents to take home. Want some recipes? Theme food ideas? Make ahead storage tips? Email me at [email protected] - I'd love to hear from you and help you in any way I can. :)
I have spent days in a hospital room next to my father. They tell me he is sick, but I don't see it in his smile. They tell me he is dying but I don't hear it in his laughter. I'm being asked to let him go but instead I hold on tight to his hands. I feel the callouses of years of hard work and I think of all of the things his hands have built. The house I grew up in - his hands built it from scratch. He built science projects and swing sets for me. He built me a wooden Barbie dream house while the other girls had plastic ones. He built a shed for my piglets, and he built me a playhouse between mountains and creeks. But more importantly - those hands built me. They put pigtails in my hair and learned how to braid. They fixed my scrapes and my first car. Those hands squeezed mine at every 'amen' during dinner grace. Those hands I now hold wrapped around my own babies just minutes after they were born, and most recently those hands made shadow puppets on the ceiling for my giggling children. I hold those hands as we make it through yet another night. I sob and those hands still wipe away my tears though I'm now an adult. I squeeze those hands with dreams of them dancing with my daughter at her wedding, knowing I have no control over such a thing. My own hands never felt so weak. Ironically, years ago his hands even helped build the very hospital room he currently resides in. I am now being asked to trust someone else to use their own hands to fix him. Can a surgeon's hands even fix my father? No one knows for sure. But I do know for sure that the hands that held mine as I learned to walk - the hands that let go of my bicycle for the first time as I learned to ride it - the hands that checked my oil before I moved away to college - the hands that let go of mine so I could learn to fly on my own - those hands are now in mine, and I am so grateful for the strength he has given me to let them go - and know that no matter the outcome, I am okay - and thankful - and blessed for all they have done for me. |
AuthorI love writing romance novels, editing other people's novels, planning parties (heavy on the theme food!) and watching movies. Cooking has also become a passion of mine (because you can't have a proper party without food!) and I love finding new hobbies when I can squeeze them in. Archives
December 2020
Categories |