Kevin Bacon will be a year old next month, so we decided to give his pen a bit of an upgrade... Here's the new piggy penthouse!
Charming, right? (Disclaimer: that TV is not for him, lol. I know it looks like he's supposed to watch it in bed, but that's not the case - it's just leftover from the previous playroom that was here, but I swear we're getting rid of it - I may be borderline crazy as it is, but not crazy enough to give my pet his own TV... :)
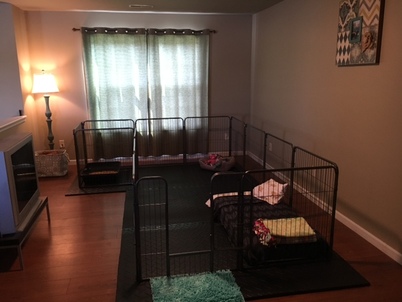
Kevin finally has a door on his pen (unlike his prior accommodations seen in my previous post, where we had to lift him in and out - at 30 pounds, he was finally getting too heavy for my kids to lift :), plus his litter box has a separate area so the pine flakes don't get into toys/bedding. Now he has plenty of space to play while we're gone!
For my pig friends, here are the pen details if you're looking to do something like this. Just a heads up, it's not necessarily a cheap project - but we wanted something that would grow with him (translation: this is his LAST pen for the next 12-15 years! :) and it's extremely functional, so it was well worth it.
I bought two 32" metal dog pens from Amazon - they vary in price from $65-$109, but I didn't see a different in quality with the different brands, so I just picked the cheapest one and it seems extremely durable/well made (especially since it will be inside away from the elements outdoors). We bought 2 pens because we wanted him to have extra space (the nice thing is, you can combine as many/few panels as you want, so you can make this into any shape you want - lots of flexibility there). The link for the exact pen we purchased is below.
Next we bought some horse stall mats from Tractor Supply (you'll want to take your pen measurements first - the mats are 4' x 6' so you'll need to figure out how many you need). I love these for several reasons - they protect our wood floors underneath, you can zip tie the panels to them so the pig can't move the pen, and they are SO easy to sweep/wipe clean. Well worth the $30 a mat. We used Gorilla tape to seal the mats to each other so the pig wouldn't be able to root the mats apart - very necessary! We also laid a 10'x12' tarp underneath it all just as a further layer of protection for the wood floors - I'm not sure if that was actually necessary or not, but for $8 I figured better safe than sorry.
Supply list: pen(s), horse stall mats, tarp, drill, and zip ties.
The how-to: lay out the tarp, lay the horse stall mats on top, and decide your pen layout - we used a silver Sharpie marker to mark where the drill holes would be (that way you can move the pen, drill the holes, and line up all your zip ties) - secure the pen to the mat, then add a few more zip ties to the joining panels (just so the pig can't rattle anything around) - and that's it! The pen simply holds together with "rods" that slide between each panel, so there are no tools for that part of the setup - so other than the drill, you don't even need any other tools! The project took several hours to complete (picking up supplies, putting it all together - getting those zip ties through the mat is the most tedious part) but overall, it wasn't too horrendous.
The finishing touch - we're waiting on the Kevin Bacon posters to come in (see above mention about me being borderline crazy - yep, the pig is getting Kevin Bacon posters for his room) - but other than that, the pig pen is complete!! :)
|
Link to the pen we bought:
|
 RSS Feed

